 novityinfo
Looping Clips in Adobe Premiere: A Straightforward Guide
Advertisement
Whether you're putting together a slick intro for your YouTube channel or crafting a montage for a music video, looping a clip in Adobe Premiere can make things smoother and cleaner. Instead of duplicating a dozen versions of the same file and hoping the cuts line up, there's a better way. And once you get the hang of it, it becomes one of those things you’ll wonder how you ever worked without.
This guide breaks it all down—no fluff, no confusing steps. Just a clear walkthrough that helps you get your loop looking seamless and sharp.
Understanding Looping in Premiere
First things first—what exactly does looping mean in this context?
When you loop a clip, you're repeating the same footage several times back-to-back. Say you've got a five-second animation, and you want it to fill a 20-second space. Instead of re-importing or dragging it over and over, looping lets you repeat that original clip without the mess.
There are two main ways to loop in Premiere. One is manual, which means you're copying and pasting the clip. The second involves nesting and some tweaks inside the timeline. Both get the job done, but which one you use depends on what you're trying to achieve.
Guide on How to Loop a Clip in Premiere - Step-By-Step Process
Method 1: Manual Copy-and-Paste Looping
Let’s start with the simplest approach.
Import Your Clip
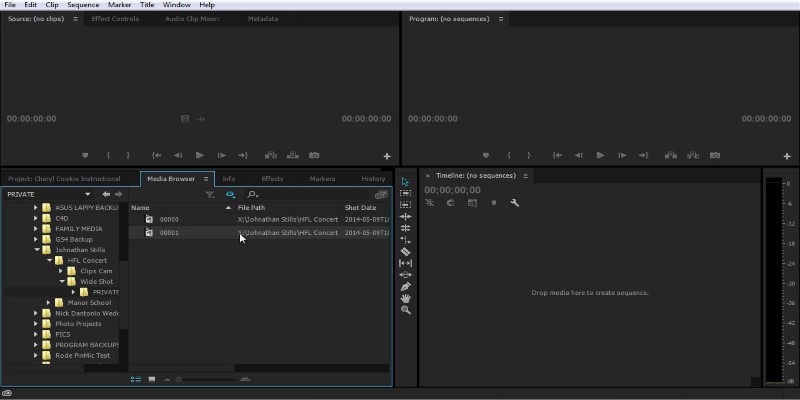
- Open Adobe Premiere.
- Head to the Media Browser and locate the clip you want to use.
- Drag it onto your timeline.
Decide How Long You Want It to Loop
- Check your timeline to see how long your sequence is.
- Figure out how many times you want your clip to repeat. If your clip is 5 seconds and your sequence is 20 seconds, you’ll need it to loop 4 times.
Copy and Paste
- Select the clip in the timeline.
- Press Cmd+C (Mac) or Ctrl+C (Windows).
- Move your play head to the end of the first clip, then hit Cmd+V or Ctrl+V.
- Do this until the clip fills the space.
Check for Gaps
- Zoom in and make sure there are no spaces between each copy.
- If there’s a tiny gap, your loop will jump and look off. Drag the edges in tight or nudge the clips left to close any space.
This method works great for fast edits and short projects. But if you're looping a longer sequence or planning to do any speed changes later, it’s better to go with nesting.
Method 2: Looping with Nesting and Time Remapping
Now, let's say you're working on a more complex sequence, or maybe you want to apply a single effect across the entire loop. This is where nesting comes in handy.
Create a Sequence with the Original Clip
- Right-click your clip in the timeline and choose New Sequence from Clip. This puts the clip into its sequence.
Nest the Sequence
- Go back to your main timeline.
- Drag that sequence you just made (it’ll appear in your Project Panel) into your main timeline. This is now a nested clip.
Duplicate the Nested Clip
- Just like before, copy and paste the nested sequence however many times you need to fill the time.
- Since it’s nested, you can now apply effects, transitions, or color adjustments just once, and they’ll apply across the whole looped section.
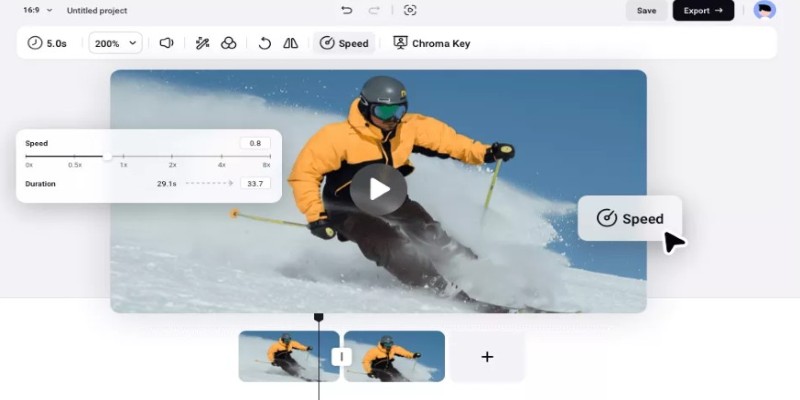
Optional: Use Speed/Duration to Match the Sequence Length
- Right-click on the nested clip.
- Choose Speed/Duration.
- Adjust the speed if you need it to stretch or compress slightly to match your timing.
This method keeps your timeline cleaner and gives you more control if you're tweaking the loop later.
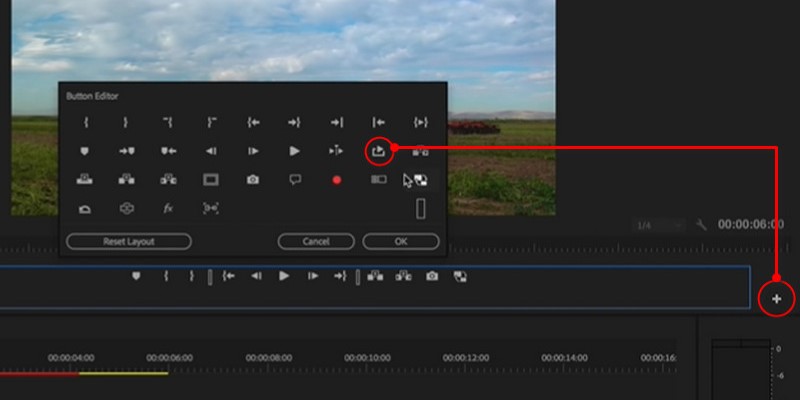
How to Preview a Loop Smoothly
Let's say you've stacked up your loop, and it's all looking great, but you want to preview it as a continuous loop. Here's how to do it:
Set In and Out Points on Your Timeline
- Move the play head to the start of your loop and press I (in-point).
- Move it to the end and press O (out-point).
Turn on Loop Playback
- Go to the top menu and click Sequence > Loop Playback.
- Or just press Ctrl+L (Windows) or Cmd+L (Mac).
Hit the Spacebar to Play
- Your loop will now play repeatedly from the in-point to the out-point. Great for catching any jumps or stutters before exporting.
When Looping Isn’t the Right Call
While looping is super useful, it’s not always the answer.
- If the clip has a start and end that don't match up visually, looping will look obvious. You'll get a jump cut or awkward frameshift.
- If there’s any camera movement, try using a cross-dissolve or a reverse loop (play forward then backward) to make it smoother.
- Some clips just weren’t made to loop. In those cases, consider trimming them down or layering them with something else.
The key is to watch the loop in context. Does it feel natural? Does it distract? If you find yourself watching the loop more than the rest of the project, something’s off.
Final Thought
Looping in Premiere doesn’t have to be a technical rabbit hole. Whether you're duplicating a clip for a slideshow or looping an animated logo, once you know the methods, it becomes second nature. Just pick the one that fits your project best and go from there.
The more familiar you get with timeline control and nesting, the more flexible your edits become. It’s not just about repeating a clip—it’s about doing it cleanly, without headaches, and in a way that fits into your larger project. And if you’re building a reel, presentation, or motion graphic, knowing how to loop properly can save time and polish your final product.
On this page
Understanding Looping in Premiere Guide on How to Loop a Clip in Premiere - Step-By-Step Process Method 1: Manual Copy-and-Paste Looping Import Your Clip Decide How Long You Want It to Loop Copy and Paste Check for Gaps Method 2: Looping with Nesting and Time Remapping Create a Sequence with the Original Clip Nest the Sequence Duplicate the Nested Clip Optional: Use Speed/Duration to Match the Sequence Length How to Preview a Loop Smoothly Set In and Out Points on Your Timeline Turn on Loop Playback Hit the Spacebar to Play When Looping Isn’t the Right Call Final ThoughtAdvertisement
Related Articles

The 10 Best AI Video Tools in 2025 to Create Smart Content Fast
Effective Tips to Make a Video Longer Without Losing Viewers
How to Get Smooth Slow Motion in After Effects Without Choppy Frames

Step-by-Step Guide to Editing TikTok Videos on iPhone
Looping Videos on iPad Without Wi-Fi or Workarounds

Explore the Best Shopify Alternatives in 2025 for Building Your Perfect Online Store

VSCO: The App for Creating Mood Through Simple, Cinematic Edits

Best Loop Players for Continuous Video and Audio Playback

Making Mute TikToks That Actually Keep People Watching Without Sound

KineMaster Video Editing App Review: A Mobile-Friendly Powerhouse

PicPlayPost Video Editor Review: Smart, Simple, and Creative