 novityinfo
How to Get Smooth Slow Motion in After Effects Without Choppy Frames
Advertisement
There’s something about slow motion that draws people in. Whether it’s a quiet moment stretched out to show every detail or an action scene that suddenly pulls back to reveal motion frame by frame, slow motion just works. But getting it to look right—especially when you’re working with footage that wasn’t shot at super-high frame rates—can be a bit of a pain. You can’t just slow a clip down and expect it to stay smooth. You need to know how to use After Effects properly for that.
Here's how to get smooth, slow motion without the choppy frames or weird warping—just clean, fluid movement that fits your scene.
Choosing the Right Footage and Setup
Before opening After Effects, your footage already plays a huge role in how good the slow motion can look. The more frames per second your original video has, the more you can stretch it without things breaking apart. That’s why 60fps or 120fps is the way to go if you know ahead of time that you’ll be slowing something down.
If the footage was shot at 24fps or 30fps, you’re asking After Effects to invent new frames. It can do it, but the result won’t always be perfect, especially with fast movement or a busy background. That’s where Optical Flow and other techniques come in—but even the best software can only work with what it’s given.
So, when possible, start with high frame-rate footage. It makes everything easier, looks more natural, and avoids a lot of cleanup later.
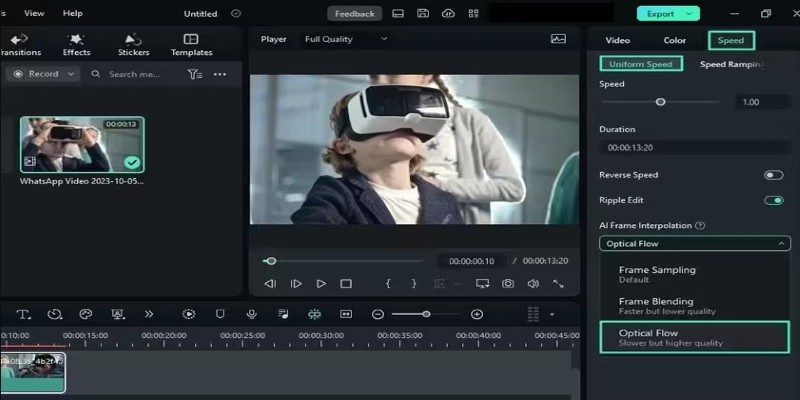
Understanding Time Interpolation Methods
Once your footage is in After Effects, you’ll need to pick how you want the program to handle the speed changes. This is where Time Interpolation comes in. It controls how new frames are generated (or not) when you slow something down.
Frame Sampling is the most basic. It just repeats or drops frames to hit the new speed. It’s fast, but it doesn’t create any smoothness. You’ll notice it right away in any kind of motion-heavy clip.
Frame Blending mixes one frame with the next. It helps a little with smoothing things out, but it can create a ghosting effect—where the old image fades into the new one. It's usable in some shots but not great for clear, clean motion.
Optical Flow (called Pixel Motion in After Effects) actually looks at the footage and tries to calculate what the missing frames should look like. It doesn't copy or blend—it builds. When it works, this method gives you smooth, seamless, slow motion. When it struggles, though, you might see odd warping or melting textures.
Use Optical Flow if you want the best result. Just be ready to step in and tweak things when needed.
Applying Effects for Smoother Motion
After choosing your method, it’s time to decide how you want to apply slow motion. There are two main tools in After Effects that people use for this: Time Remapping and Timewarp.
Time Remapping
This gives you keyframe control over the speed of your clip. You can slow down one part, speed up another, and create smooth transitions between them.
To use it:
- Right-click the clip and choose Time > Enable Time Remapping.
- Set keyframes where you want the speed changes to happen.
- Stretch keyframes further apart to slow that section down.
If you want it to flow nicely, don’t skip the Graph Editor. Select the keyframes and hit F9 (Easy Ease), then use the handles to ease into or out of the speed change. That’s what makes it feel natural, not abrupt.
Timewarp
Timewarp is a separate effect you apply from the Effects > Time menu. It's best when you want the whole clip slowed down rather than adjusting the timing manually.
Once added:
- Set the Speed to something less than 100% (e.g., 50% for half speed).
- Change the Method to Pixel Motion for better results.
- Adjust Vector Detail and Smoothing if needed.
Timewarp uses the same Pixel Motion engine as Optical Flow. It gives you more settings to control the result, which helps avoid strange warping or edge tearing. You don’t need to use both Timewarp and Time Remapping at the same time—just pick the one that fits your clip.
Fixes, Workarounds, and Extra Tools
Sometimes, no matter how careful you are, weird things happen. A person’s arm might stretch like rubber. A fast-moving object might blur into a shape that doesn’t make sense. That’s not you doing it wrong—it’s just how Optical Flow behaves when it gets confused.
Here are some ways to fix or hide that:
- Mask the area and apply a different interpolation method just to that part.
- Use Directional Blur or CC Force Motion Blur to distract from visual errors.
- Pre-render the clip with slow motion applied and re-import it to keep your timeline cleaner and playback smoother.
- Duplicate the layer and experiment with different effects on the copy.
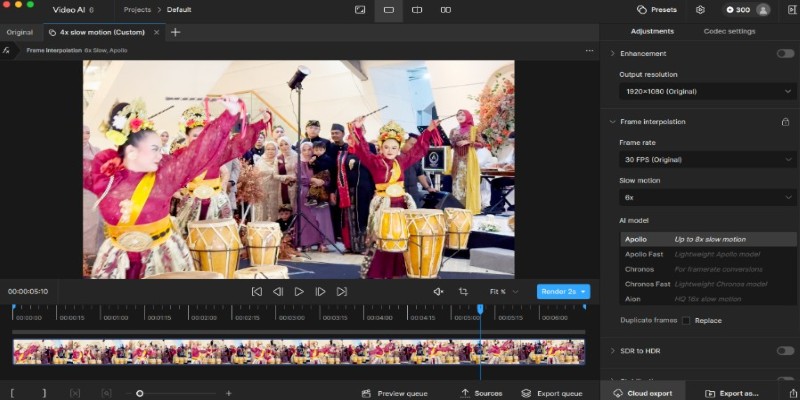
If you’re dealing with more demanding footage—especially scenes with fast motion, hair, or complex backgrounds—there’s a chance After Effects won’t be able to pull off perfect results. That’s when a plugin like Twixtor can step in. It’s designed specifically for high-end slow motion and can often do a better job at creating natural results.
Twixtor works similarly to Optical Flow but gives more precise control. You can tune motion sensitivity, isolate objects, and get cleaner edges. It's not automatic, and it takes time to tweak settings, but it’s trusted in film, commercials, and music videos where quality can’t be compromised.
Final Thoughts
Getting smooth, slow motion in After Effects doesn't happen by accident. It takes the right footage and the right settings, and sometimes, it takes a bit of trial and error. Start with the best source you can get—high frame-rate footage helps more than anything. From there, pick between Time Remapping or Timewarp, depending on whether you want full control or a simple slowdown.
Always be ready to adjust your interpolation settings. Optical Flow (Pixel Motion) gives the smoothest results most of the time, but it’s not perfect. Knowing how to spot problems and fix them—whether with masking, blurring, or pre-rendering—makes a big difference.
Advertisement
Related Articles

ShotCut Video Editor: A Simple and Reliable Free Tool for Video Editing

How to Combine Photos and Video Clips in a TikTok Post: A Complete Guide

Step-by-Step Guide to Editing TikTok Videos on iPhone
Top Desktop Apps for Smooth Slow and Fast Motion Effects

Best Loop Players for Continuous Video and Audio Playback

KineMaster Video Editing App Review: A Mobile-Friendly Powerhouse
Smooth Slow Motion in Sony Vegas: Top 7 Editing Techniques
Smooth Slow Motion Editors: Top Tools for Phone and Computer

LumaFusion: Pro-Level Video Editing from the Palm of Your Hand

Step-by-Step Guide to Converting MP4 Videos into PNG Images Online
How to Get Smooth Slow Motion in After Effects Without Choppy Frames